How to Integrate Influ2 with HubSpot
Last updated: May 20, 2026
Connecting Influ2 to HubSpot lets you sync contacts, send engagement notifications, and map Influ2 metrics to HubSpot fields. This keeps your CRM current with ad engagement and intent data.
Before you start, you'll need:
Admin access to both your Influ2 and HubSpot accounts
To know which metrics you want to track in HubSpot (impressions, clicks, visits, intent signals, etc.)
Steps to connect
In Influ2, go to Settings > Integrations > HubSpot.
Click Connect and authorize Influ2 to access your HubSpot data.
Once connected, you'll see five tabs: Connection, Notifications, Metrics, Contacts, and Marketing Activities.
Set up notifications
Notifications send HubSpot alerts when targets engage with Influ2 campaigns. These appear as Custom Objects in HubSpot, so you can track each signal type with detailed properties. Available signal types include title changes, company changes, LinkedIn posts, search intent, content intent, and sales prioritization events.
Go to Settings > Integrations > HubSpot > Notifications.
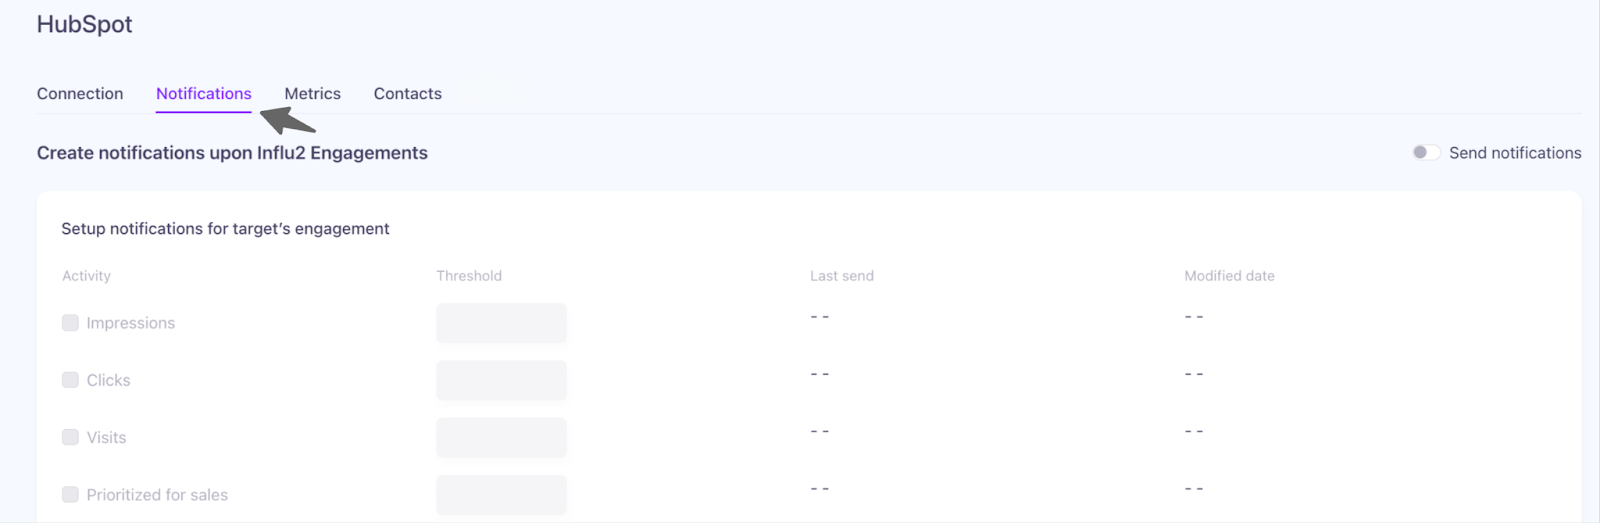
Toggle Send Notifications to ON.
Select which activities should trigger notifications:
- Impressions — set a threshold (the number of impressions before triggering a notification; default is "All")
- Clicks — notified on every click
- Visits — notified on every landing page visit
- Goals — notified based on specific page actions like form submissions
- Prioritized for Sales — notified when a contact is flagged for sales outreach during a journeyReview the Last Sent and Modified Date columns to track recent changes.
Repeat for Account-level notifications (Accounts exclude the Goals option).
Click Save.
Preview Notifications: View engagement events in HubSpot’s activity section. If Influ2 activities don’t appear, check the Filter Activity in HubSpot and enable Influ2.


Track notifications in HubSpot
Once enabled, view engagement events in HubSpot's Activity section on each contact's profile. If Influ2 activities don't appear, check HubSpot's Activity Filter and enable Influ2 notifications there.
Each notification includes details like:
Content name and URL
Topics the contact engaged with
Date and time of engagement
For job changes: previous and new title/company
Set up metrics
Metrics sync Influ2 engagement data to HubSpot fields on Contact, Company, and Deal objects. This gives you a complete view of campaign impact in your CRM.
In HubSpot, you can create custom properties for the metrics you want to track. Use the correct data types:
Numeric for counts (impressions, clicks, visits, intent signals)
Date/Time for dates (first impression, last click, etc.)
Text for creative names
URL for creative URLs
For more information, refer to HubSpot's custom property guide.
In Influ2, go to Settings > Integrations > HubSpot > Metrics.
Select the metrics you want to activate and map each one to the corresponding HubSpot property.
Repeat for Contact, Company, and Deal objects. (Not all metrics apply to all objects.)
Click Save.


Available metrics for Contact and Company
Total Number of Impressions, Clicks, Visits
Number of Impressions, Clicks, and Visits this year
First/Last Impression, Click, and Visit Dates
Last Seen/Clicked Creative Name and URL
30 Days Impressions, Clicks, Visits
Search Intent Signals (count and last date)
Content Intent Signals (count and last date)
LinkedIn Posts Signals (count and last date)
Topics (comma-separated list of interest topics)
Last Signal Topics (most recent topics)
Note: If you're unable to select the "date and time" property type, please set them as "date", and we'll correct this issue on our end.
Available metrics for Deal
Total Impressions, Clicks, Visits
Impressions, Clicks, Visits Before/After/During Opportunity
Impressions, Clicks, Visits During Influence and Outreach periods
First/Last Impression, Click, and Visit Dates
Last Seen/Clicked Content URL and Name
Influence Period Start and Outreach Period Start dates
Influ2 Influence (checkbox field — true/false)
Set up automatic contact creation
If targets from your audience engage with ads but don't yet exist in HubSpot, Influ2 can create new contact records automatically. This is useful when:
Your audience comes from Salesforce or a manual upload, but you want to track signals in HubSpot
You're targeting expanded audience members (new people at your target accounts) who show engagement intent
Please note: Creating contacts is optional and can be turned on or off at any point.
Go to Settings > Integrations > HubSpot > Contacts.
Toggle Create Records for Unmatched Targets to ON.
Influ2 will create a contact when the target meets notification thresholds but isn't already in HubSpot.
The new contact record will include: Email, First Name, Last Name, Website, Company Name, Phone, and LinkedIn URL (if available).
How to configure Marketing Activities
Your HubSpot instance holds a wealth of marketing activity data—form submissions, email clicks, and more—that reveals buyer intent. Bringing that activity into Influ2 gives you a single, unified view of buyer behavior alongside Influ2’s own signals, so no high-intent moment gets lost in a separate tool.
To configure this, simply navigate to the Marketing Activities tab in the HubSpot integration screen and toggle Marketing Activities ON.

Approved IPs
If your organization restricts API calls by IP address, add these Influ2 IPs to your approved list:
35.224.81.3
35.232.17.171
What you'll see
In HubSpot, scroll to the Influ2 Properties section on any contact or company profile to view synced metrics. You'll see intent signals, creative attribution, and rolling 30-day windows all in one place.
