How to Configure Target Followers and Notifications
Last updated: September 17, 2026
Follower settings define who gets updates about specific targets — including signal notifications, visibility in your Target Report, and access to Signals Center. Instead of a single "contact owner," you can assign multiple followers. This is especially useful when both an SDR and AE own a target, or when leaders need oversight of how signals are being used.
Who should be a follower?
Followers should be:
People who act on signals when a prospect shows intent (BDRs, AEs, sales reps, etc.)
People who need visibility into how others are using signals (sales managers, operations leaders, etc.)
This guide walks you through configuring followers so the right people receive and act on buyer signals, including Slack and Microsoft Teams notifications.
Before you start
You need admin access to configure follower settings
Your CRM (Salesforce, HubSpot, Salesloft, Outreach, or MS Dynamics) must be connected to Influ2
Steps
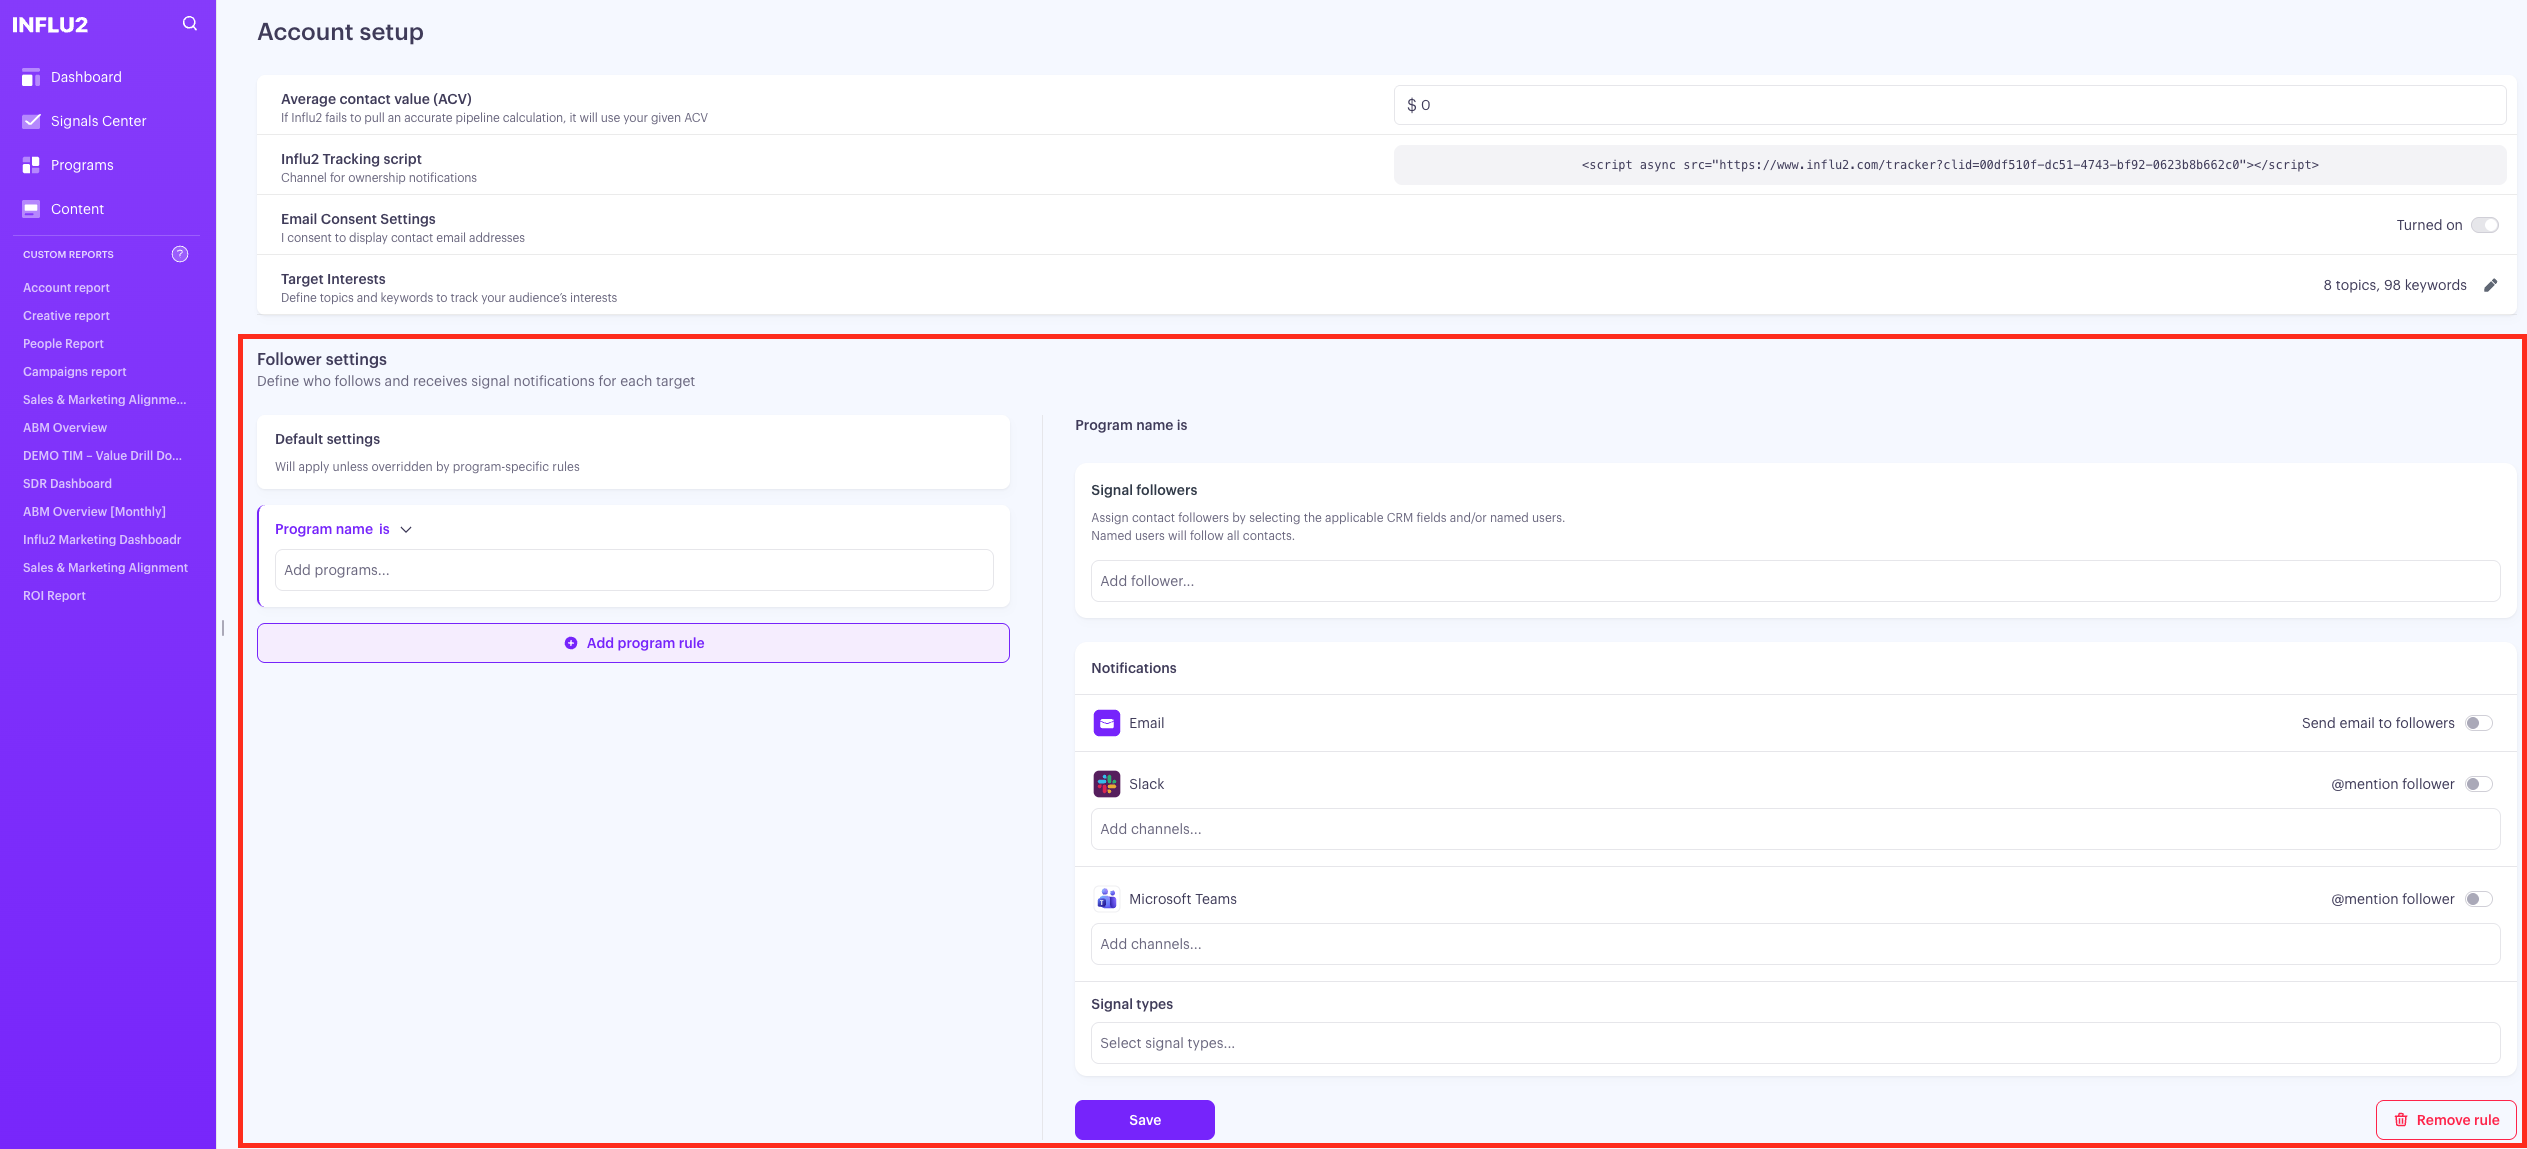
1. Navigate to Follower Settings
Go to Settings
Open the Account tab
Scroll to the Follower Settings block


2. Set up Default Followers
The Default Settings block contains global follower rules that apply to all audiences unless overridden by program rules. Admins can define up to 20 mapping rules.
Choose a source for followers:
Option 1: Contact-Level Fields
Select a field like "BDR Owner" on the Contact object
Result: Anyone listed in that field becomes a follower for that contact
Option 2: Account-Level Fields
Select a field like "Account Owner" on the Account object
Result: The Account Owner becomes a follower for all contacts at that account
Please note: For options 1 and 2 above, users can only select Salesforce fields with User reference type in their CRM. See Salesforce documentation for more information.
Option 3: Named User
Select a specific user from your CRM
Result: This user is assigned as a follower to all contacts (useful for leaders who need oversight)
Default follower rules by CRM:
Salesforce: Contact Owner
HubSpot: Contact Owner
Salesloft and Outreach: Read-only owner fields
MS Dynamics: Owner (read-only)
3. Configure Signal Followers
Under Signal Followers, define who gets assigned as a follower using CRM fields or specific Influ2 users. You can assign unlimited followers.
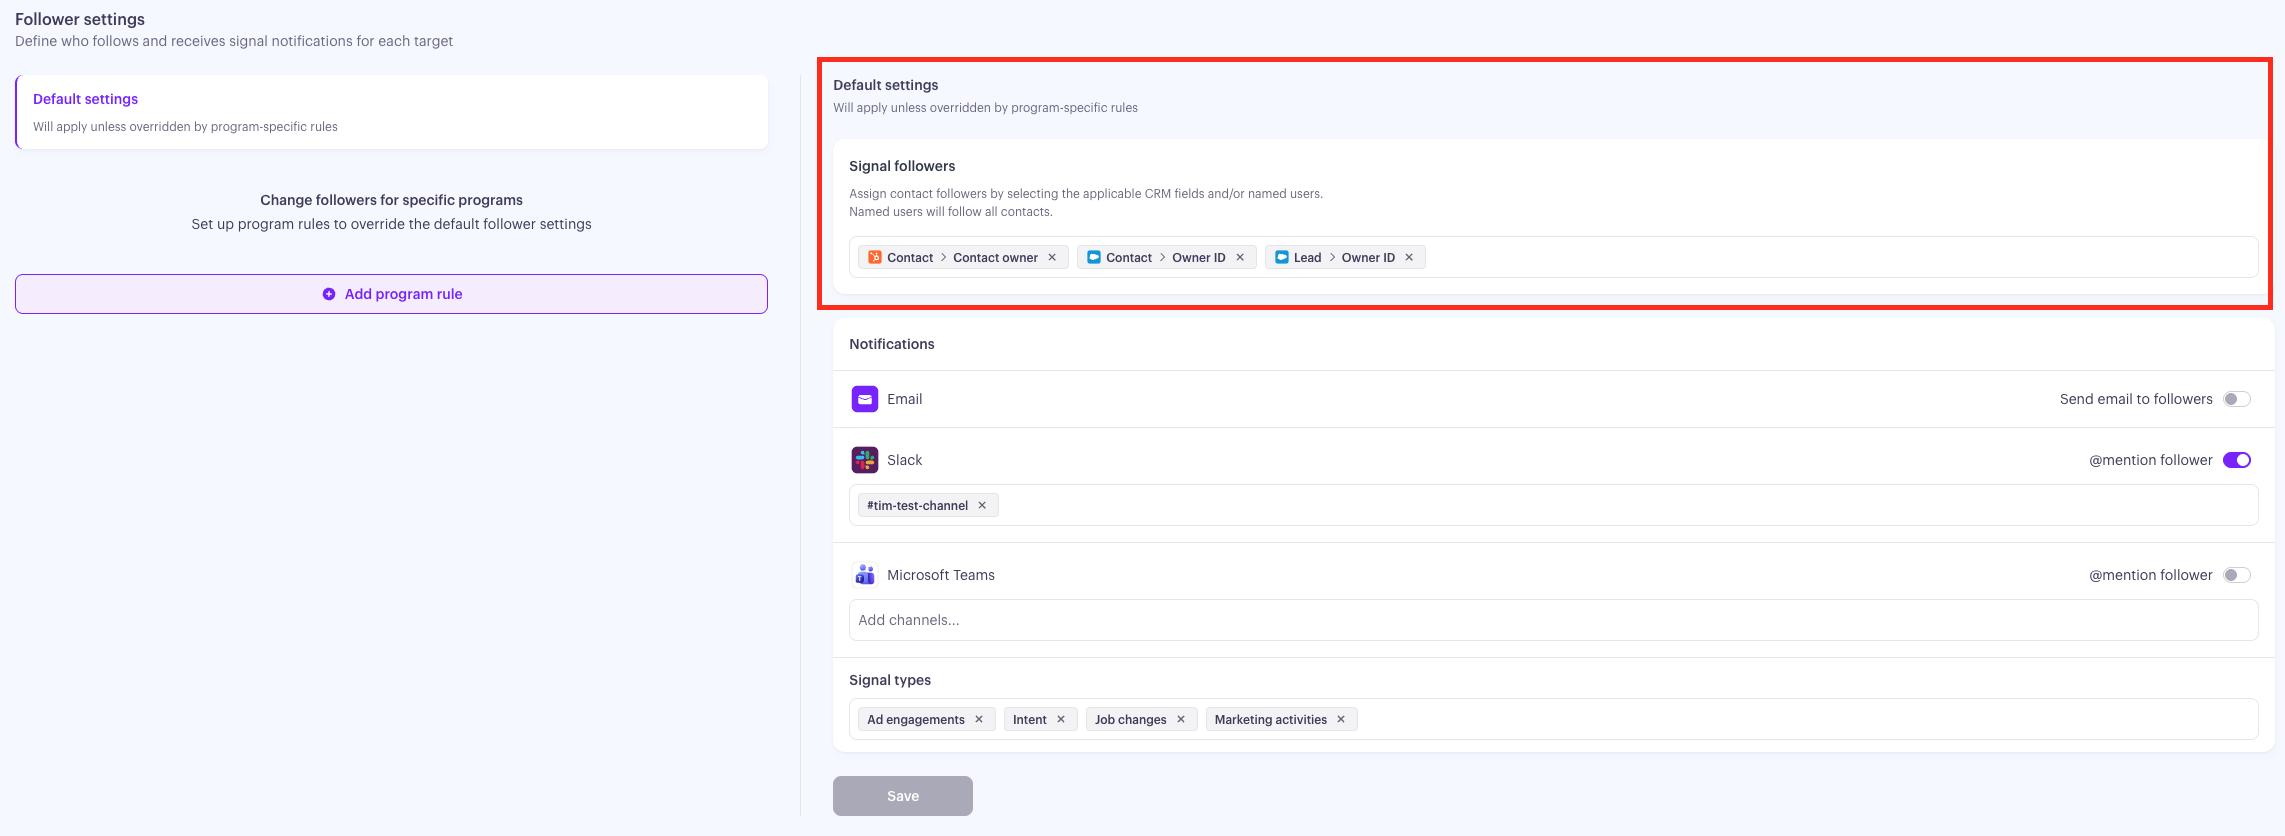
This works the same way as default settings—choose your data source (contact-level field, account-level field, or named user), and followers are assigned automatically based on that source.
How followers are assigned for Influ2 suggested audience signals
Some signals come from people Influ2 discovered through audience expansion -- contacts who aren't in your CRM, but work at accounts you're already targeting. Since there's no CRM record to pull a follower from, Influ2 looks at who's already working that account in your audience and assigns them as the follower instead.
This applies to search intent, content intent, new hire, company joined, and website visitor signals.
For example:
If a search intent signal comes in for someone at Acme Cop, and you have two contacts at Acme Corp in your active audience followed by Alice, the Influ2 suggested signal gets assigned to Alice as well, so she is aware that someone in her target accounts is showing interest.
Your existing follower settings apply with no extra configuration needed. Influ2 uses your default follower rules and any overrides already in place.
If Influ2 can't find any matching contacts at the account, the signal will appear as Unassigned.
4. Choose Which Signals Notify Followers
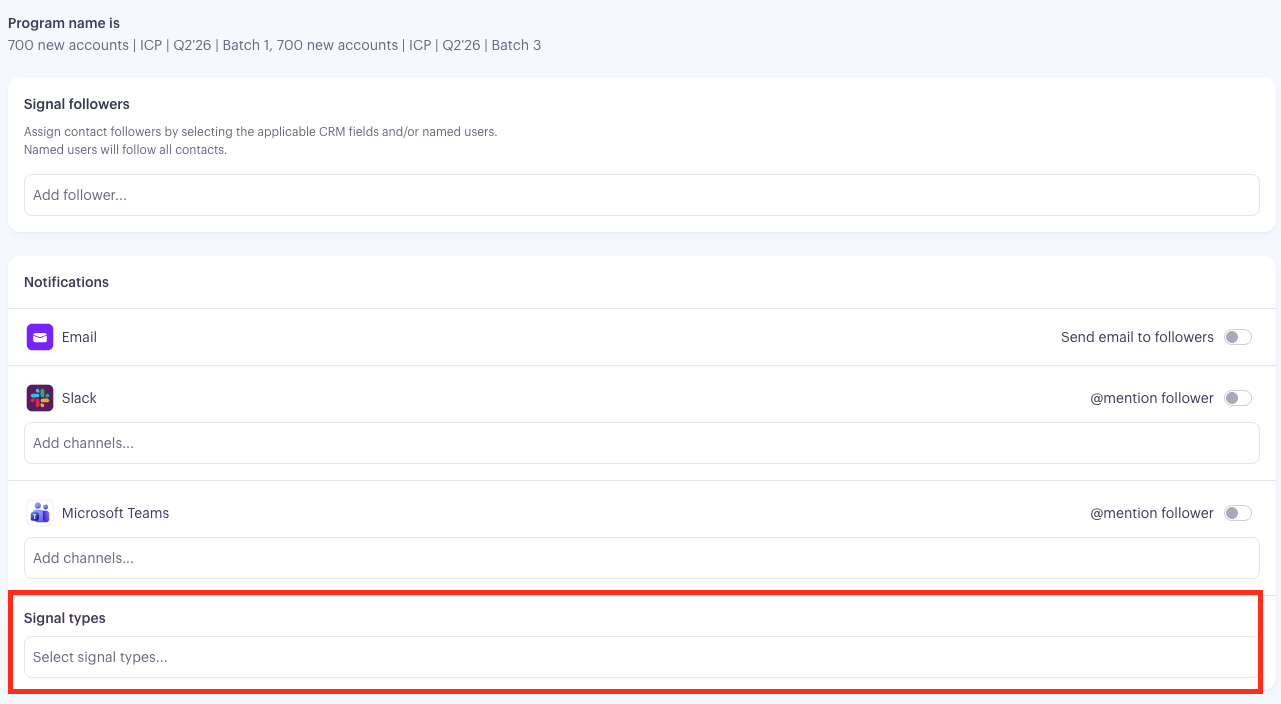
Assigning a follower controls who's tracking a target. A separate setting controls which kinds of activity actually notify them — this is the Signal types block, available in both Default Settings and every Program rule.
Turning a category off only stops notifications for it — the underlying signals stay fully visible in Signals Center and the Target Report either way.
The categories are:
Ad engagements — ad clicks and website visits.
Intent — search intent, content intent, and social post signals.
Job changes — new hires and title changes.
Marketing activities — HubSpot activity such as form fills, email opens and clicks, and event registration or attendance.
Marketing hand-off — notifications generated by a Marketing hand-off action you've placed on a journey step or stage (see Within a Program: How to Use the Actions Tab).
At least one category needs to be selected for a given row to save.
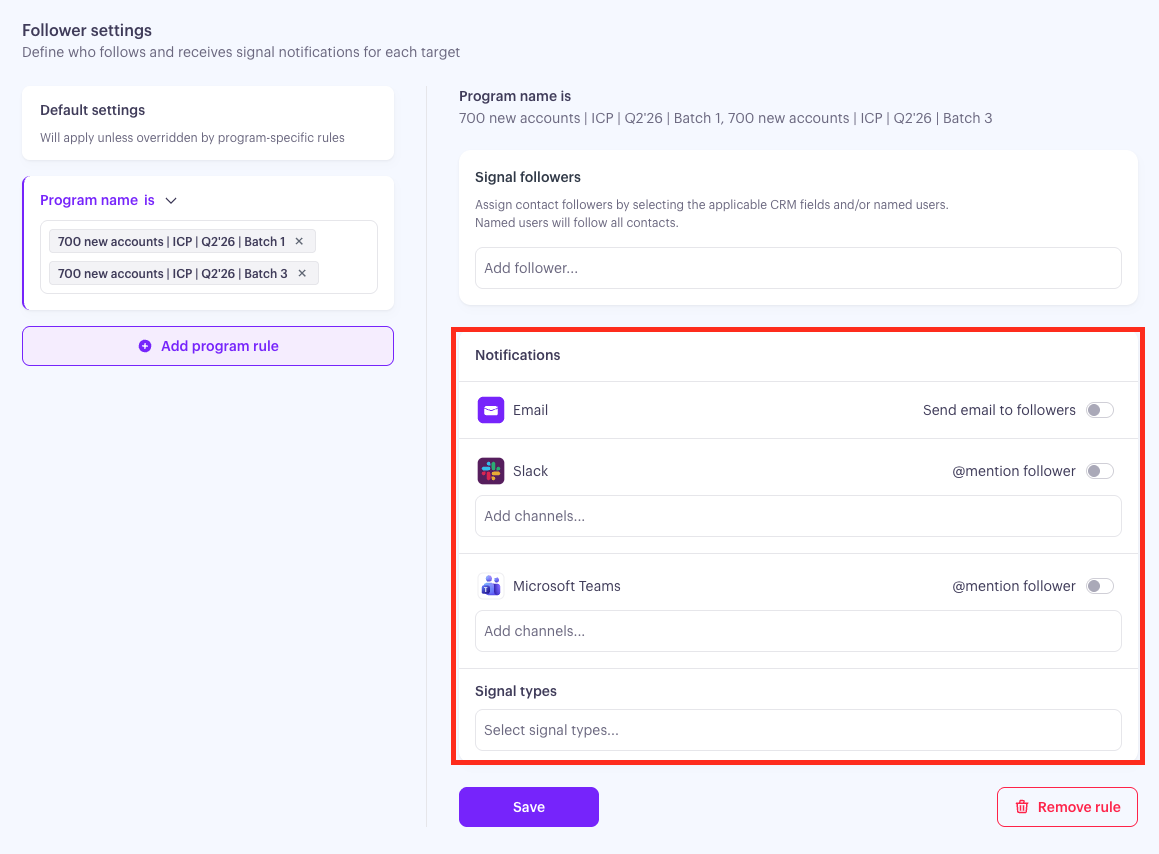
5. Set Up Notification Channels
The Notifications section defines where followers receive signal alerts.
Email Notifications
Toggle on Email to send notifications directly to followers. Emails come from team@influ2.com with the subject line "New {signal type} signal in Influ2."
Slack Notifications
Click Connect next to Slack
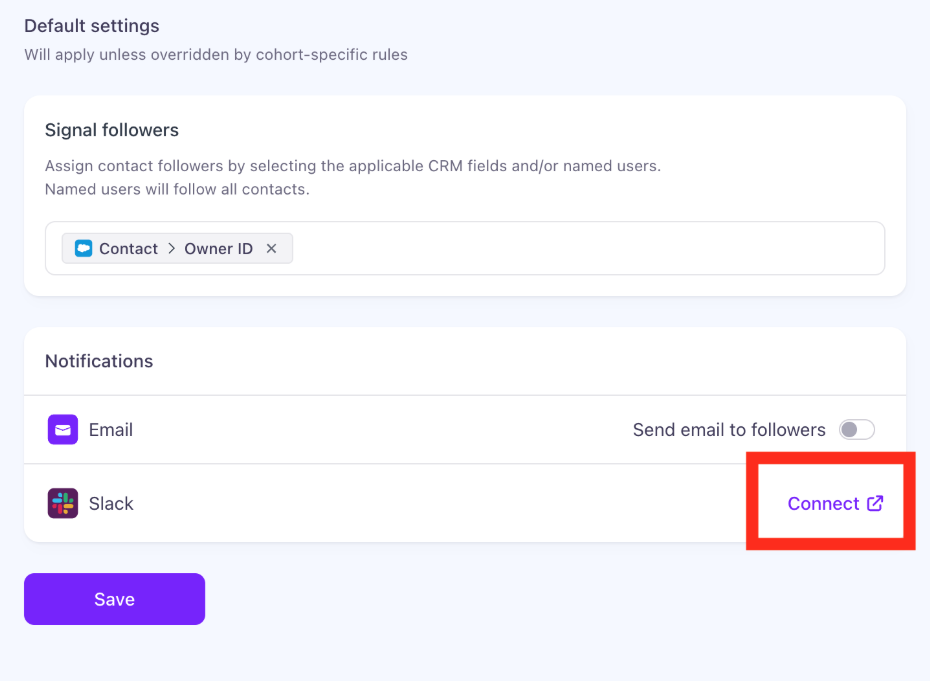
Follow the prompts to authorize Influ2
Choose whether to send notifications to:
- A specific Slack channel, or
- Direct messages to individual usersKeep in mind: if a Slack channel is configured, Unassigned signals (signals where no follower can be derived) will also be sent to that channel.
Optional: Enable Mention Follower to tag the user directly in Slack (so they don't miss the notification)

For Private Slack Channels:
Once your Slack instance is connected, public channels appear by default. To make private channels available:
Open the private Slack channel → view members → Integrations tab → Add an App → Search for Influ2 → Add

Or:
- In Slack, go to Tools → Apps → Search for Influ2 → Select Influ2 Signals Center

Microsoft Teams Notifications
Click Connect next to Microsoft Teams
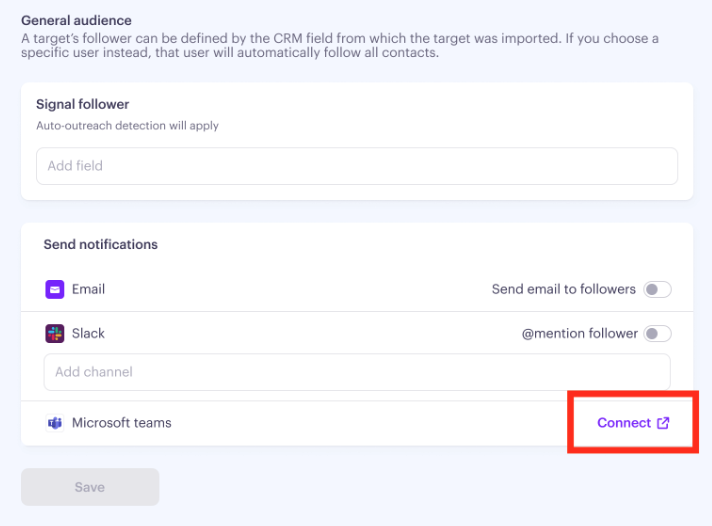
Follow the prompts to authorize Influ2
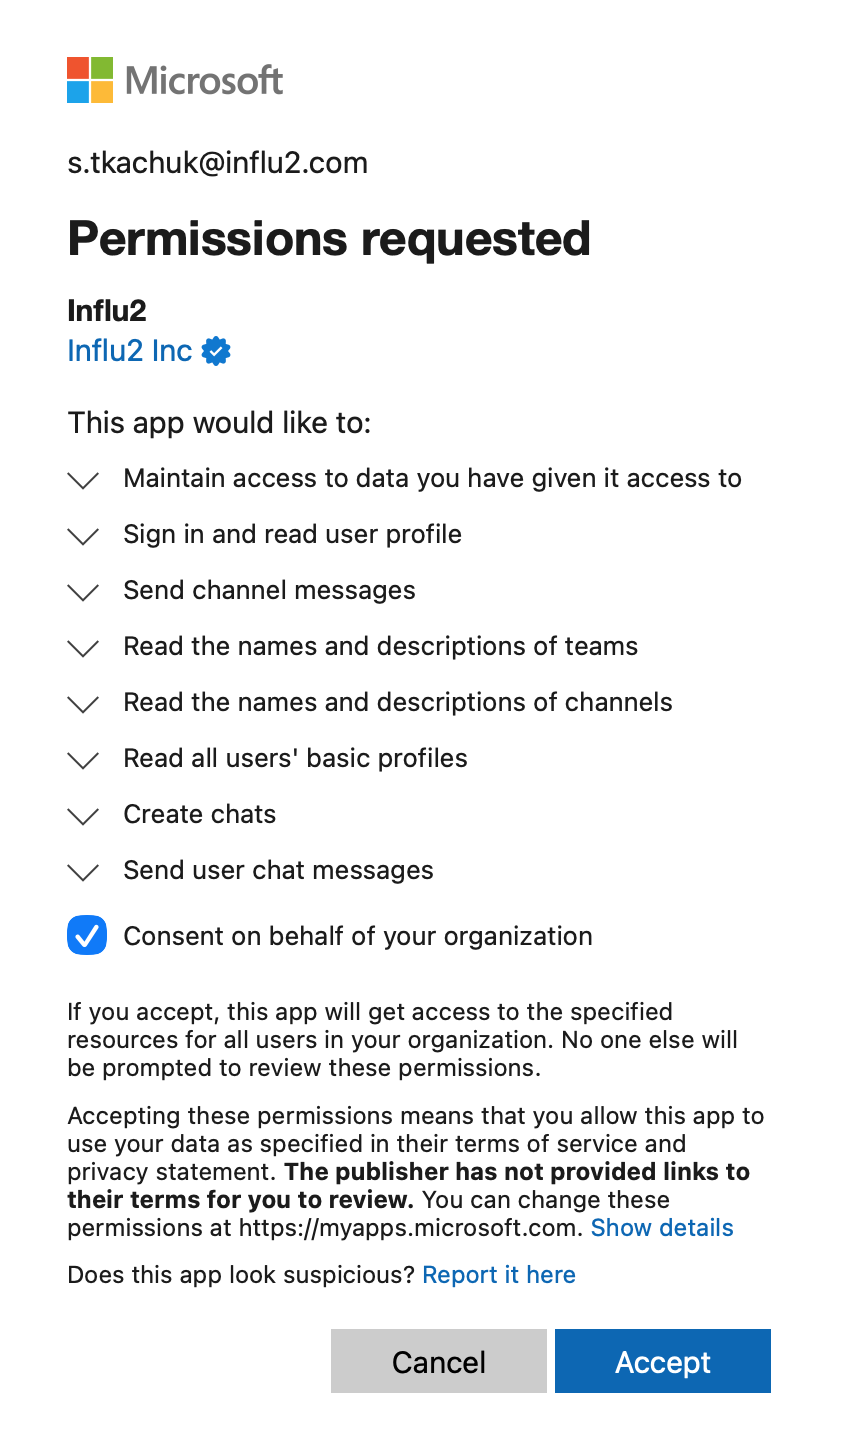
Select which Teams channels to send notifications to
Remember: Microsoft Teams doesn't currently support private channels. All channels selected for Teams notifications must be public.
Choose between channel posts or direct messages
Keep in mind: if a Teams channel is configured, Unassigned signals (signals where no follower can be derived) will also be sent to that channel.

5. Send a test notification
Once a channel is set up, use its Send test button to confirm notifications actually reach their destination. Each channel — Email, Slack, and Teams — has its own button, and it's active as soon as that channel is ready to receive notifications (a channel or "Direct messages" added for Slack/Teams, or the Email toggle turned on).
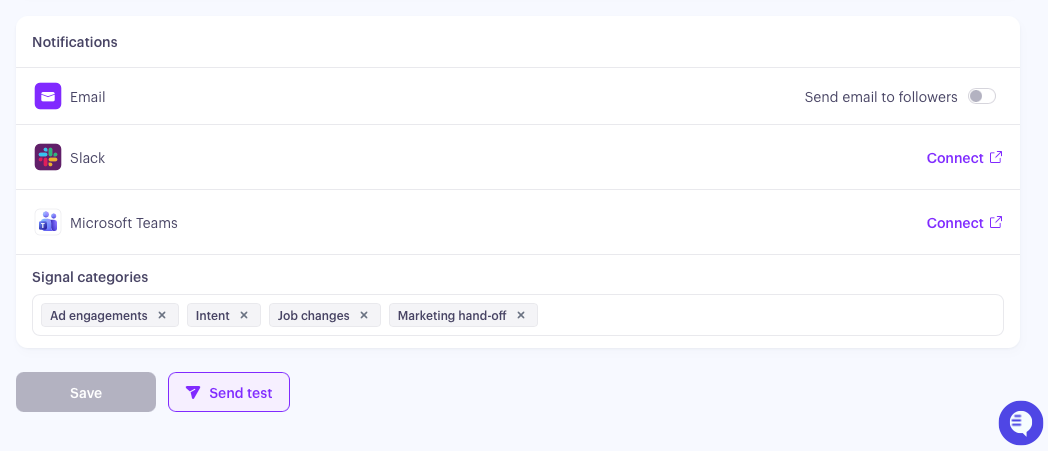
Clicking Send test sends a sample card, marked [TEST], to you — either your DM/inbox or the configured channel, never to your real followers. It uses whatever you currently have in the notification template editor below, including unsaved changes, so you can preview your wording before committing to it. You'll get a per-channel confirmation, or a specific error message (for example, if the Influ2 Slack app isn't in the channel yet) telling you what to fix.
Keep in mind: each channel's Send test button has a short cooldown between uses, so give it a few seconds between test sends.
6. Customize Your Notification Template
By default, Slack, Teams, and Email notifications use a standard template. You can now edit that content yourself — one edit applies across all three channels and every signal category, so you only maintain a single message.
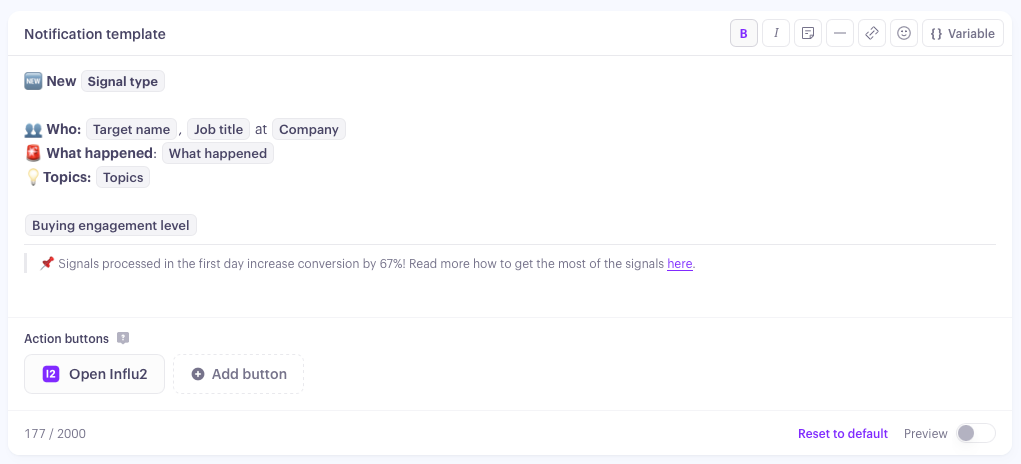
To edit your template:
In the Notifications section of Follower settings, open the template editor. It opens pre-filled with your current notification body.
Edit the text freely — rewrite, reorder, or delete any part of it, and add your own free text or emoji anywhere.
Insert a variable by typing { to open the variable list, or picking one from the panel. You can only insert variables from this list — typed braces stay as plain text rather than becoming a working variable.
Optional: add a Salesforce or HubSpot button from the Action buttons panel (only available if that CRM is connected). The Influ2 button is always included and can't be removed.
Click Save, or click Reset to default to discard your changes and restore the original template.
Available variables:
{signal type} — the type of signal, for example Engagement Intent.
{target name} — the contact's first and last name, linked to their Target Report.
{company} — the contact's company, linked to the Account Report.
{job title} — the contact's job title.
{linkedin} — a link to the contact's LinkedIn profile.
{programs} — the active and paused programs the target is currently in.
{creative} — a preview image, name, and Content Report link for the ad creative the person engaged with. Only resolves for Ad engagement signals — it's left out of every other notification.
{engagement level} — a line describing buying group activity around the target, for example "Engaged buying group — 2 other contacts have recent intent signals."
{what happened} and {topics} — the existing signal-specific description and related topics.
If a variable doesn't have a value for a given signal — {creative} on a non-ad signal, for instance — it's simply left out, and the rest of your text around it still appears normally.
Keep in mind:
The body has a 2,000 character limit.
Some parts of the notification stay fixed and aren't part of the editable body: the Influ2 button, follower @mentions in Slack and Teams, and the subject line, greeting, and sign-off in Email.
A notification only reaches channels that are actually connected and turned on — editing the template doesn't change delivery.
7. Set Up Program Rules (Optional)
Each Program's Cohort Tab combines one or more audiences via Include and Exclude blocks. Program Rules below still apply to those underlying cohorts/audiences regardless of which Program they belong to, so existing rules carry over without any changes needed.
How it works:
Program rules take priority over default rules. Create rules based on:
"Program is" — select up to 5 specific programs
"Program name contains" — use text matching for dynamic rules
If multiple rules apply, followers are merged (duplicates removed). Changes apply retroactively.
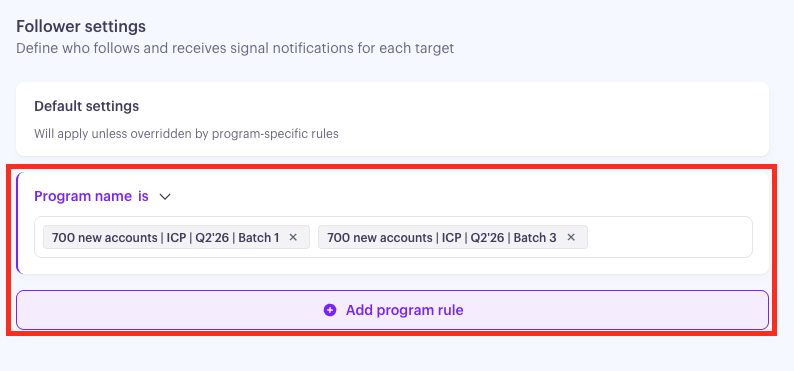
Example 1: If program name is "Current Customers," assign a specific user (like your Customer Success lead) as the sole follower for that program.
Example 2: If program name contains "Enterprise," assign specific followers for all enterprise account segments.
You can also set program-specific notification rules—these override general notification settings.

What you'll see
Once followers are configured, they'll start receiving notifications. Each notification includes:
Tagged followers — showing who's tracking this contact
Clear context — what the engagement means, so teams can craft relevant outreach
Key contact details — identifying which target the signal is from
Additional context — if multiple buying group members are engaged
Quick access — links to signal guidance and the target report in Influ2 or Salesforce
Feedback option — so you can help Influ2 improve signal quality
Examples
Content Intent

Search Intent

Social Intent

Engagement Intent

Job Change
